How To Make A Knitting Machine Needle Retainer Sponge Bar Part 3: Fuse Interfacing, Tape Ends, And Reinstall
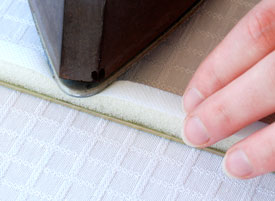 You are so close to being done.
Now that you have cleaned out the old gunk and glued in the new foam, it is time to attach the interfacing, tape the ends, and reinstall the bar into your knitting machine.
You will need a steam iron, woven fusible interfacing, ruler, pen, fabric scissors, and a small bit of packing tape. A rotary cutter and cutting mat are optional.
What To Buy
Fusible interfacing comes in a variety of fabric blends, thicknesses, and widths. I found woven worked the best. If you have some non woven at home, go ahead and try it out. I don’t think you will be disappointed.
If you need to buy, choose woven. For all the friction generated by the carriage moving the needles back and forth under the sponge bar, a woven variety should hold up better. I used both types of interfacing for this tutorial. Each adhered easily, and seemed to work identically. How it holds up long term is yet to be determined.
For woven, I bought 4 feet (122 cm) of Pellon Stacy Shape-Flex SF101. It is 20″ (50 cm) wide, 70% Polyester 30% cotton, and sold for $3.49 a yard. For non-woven, I got Pellon ShirTailor 950F. It is 22″ (56 cm) wide, 100% polyester, and cost $2.49 a yard.
Where To Buy
JoAnn’s on a 50% off sale. The woven set me back $2.32 for 4 feet (122 cm). The non-woven $1.65. Ridiculously cheap when you consider how many 3/8th inch (1 cm) strips you can get out of 20 inches (50 cm).
How To Finish
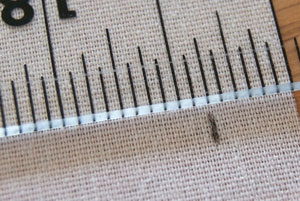 Measure a 3/8″ (1 cm) wide strip at least two inches longer than your foam.
To make my life easy, I buy 4 feet (122 cm) which is more than long enough for my lengthiest bulky machine. This gives me a little extra to hang over each end when I fuse it to the foam.
 Using fabric scissors or a rotary cutter, cut the interfacing.
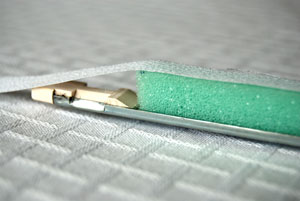 Lay the fabric on top of the foam with a bit sticking off each end.
 Following the directions for your fusible interfacing, turn on your iron to the specified heat and spot tack the material to the foam.
For my woven interfacing, I used the medium steam setting and held the iron in place for two to three seconds. I tacked the fabric every 6 to 8 inches (15 to 20 cm).
 After tacking, lay a moistened pressing cloth on top and iron the interfacing to the foam. My Pellon directions required 10 to 15 seconds per each overlapping section.
You do not have to press down hard. As long as the iron makes solid, gentle contact, you are good. If you remove your pressing cloth and find the interfacing is not stuck, simply go over that section a second time.
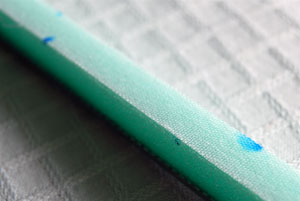 If you don’t glue the marked side of the foam to the bottom of the metal tray, this is what happens.
The steam iron causes the ink to bleed through the interfacing.
Not the end of the world. Just a tad ugly.
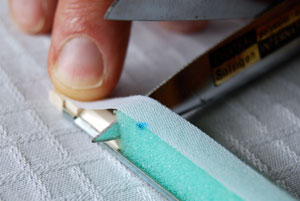 After the interfacing is all fused, trim off the excess from each end.
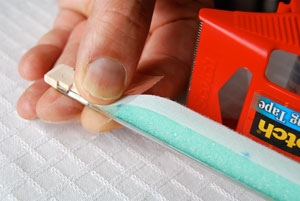 Cut off two pieces of strong packing tape, such as Scotch, and secure both ends.
You will want about a 1/2″ (1.3 cm) of the tape on the foam and the other 1/2″ (1.3 cm) on the metal.
 The tape should cling tightly all the way around the bar.
Your knitting machine needle retainer sponge bar is officially done.
To make sure everything is set and dry, I’ll wait 24 hours before installing the refurbished bar in my knitting machine.
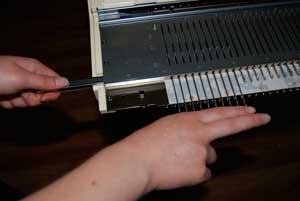 When you are confident your glue has dried, it’s time to reinsert the bar into your knitting machine.
Pick either side. While holding down the needles, slide the bar down its channel.
Share Your Thoughts
After making over a dozen sponge bars, I’m thoroughly pleased with how well they work, how inexpensive the materials are, and how easy it is to do, especially after getting over any nervousness of needing to cut foam or interfacing perfectly. Several of my attempts had gouges in the foam from an unsteady cutting hand. It made absolutely no difference in their performance.
If you make a bar, please share your results in the comments below, regardless of how far into the future you find this post. How has your bar held up? Did you use a different product that worked better for your situation? How long did it last? What did you use to clean out the old gunky glue?
Our machines benefit from everyone’s input.
Related Posts
- How To Make A Knitting Machine Needle Retainer Sponge Bar Part 1: Remove The Old And Clean For New
- How To Make A Knitting Machine Needle Retainer Sponge Bar Part 2: Cut and Glue Foam
- What Is A Knitting Machine Sponge Bar And Where Is It Located?
- InKnitters And Machine Knitters Source Magazine Are Dead
- Hat-a-thon, Beginnings, And A Simple Machine Knit Hat Pattern
July 26, 2008


110 comments
Here’s a thought…why not fuse interfacing to the foam before cutting and sticking it in? Has anyone tried that. I have an LK150 and Brother 930 that both need new sponge bars. Which foam would work best? The green high density?
Thank you for the post.
I’m looking forward to using your suggestion – a brilliant tutorial! Many, many, thanks.
I’d given up on my Brother 881 for maybe 15 years. The local dealer retired – I was stuck.
An elderly friend who is moving has just given me about 3 “Brothers”, including a 950, a ribber, and a garter carriage. (Also bits of Passap, Toyota? & KM?.) All needing TLC. I’m not sure what bits I have, or if anything is missing nor if they work!
So 1st thing, check needles, then make sponge bars, then clean everything, then identify & assemble. Then start knitting. I Hope!
When I know what I have, is there any site to contact other knitters, who might need what surplus bits that I have? I do know that there are lots of yarn fittings, wool & skein winders, weights, punchers….., please? They occupy 3 large drawers as well as the machine lids & it would be a crime to throw them away of they can be used.
Good Luck to us all, and, again, my thanks!
Thank you for very easy to follow instruction for renewing spongebar. Mine works beautifully on knitting carraige but jams up when i use the ribber. I am so frustrated with it. Any suggestions please?
Just put new foam strip into the retainer bar as the one i did in june seems to have flattened out. Maybe i need to remove the bar between knitting sessions. If it jams again i will know to check it.
Hi I did this as well. I’m in the UK so the things I used have different names, but the same results. I used stuff called Sticky Stuff Remover, from Betterware, to remove the gunky foam and glue. I used White Glue, which is a craft glue, and washable. Then foam insulation, that we use round doors to keep the draughts out, which I thought was the right depth. But looking at your foam, it wasn’t that deep. It has done 6 months, but it will probably need doing again soon. So I will use the same method as you next time. It looks much harder wearing.
Thanks for the help.
Lesley
just got a used singer 312 knitting machine, very used, with your help on the sponge bar, i can now learn how to use this singer memomatic card reader, thank you so much for poasting this info. i am looking forward to more post from you on the care of the knitting machines
The piano industry has been making long thin felt pads that can be purchased in many lengths and thicknesses. Has anyone tried these as a replacement for a sponge bar? It seems to me that these felt strips can take a lot of pounding.
Just wanted to say thanks for this set of articles. It helped a lot.
I have a Brother KX-390 that had barely been used in about 20 years, and was untouched for at least the last 9, and when I broke it out this past week the needles on the ends of the work began to jam consistently. I found your site and sure enough, the sponge bar had utterly deteriorated, so I made a new one using your instructions as a guide.
A couple of things to note for anyone replacing the sponge on the KX-390:
First, the sponge bar isn’t in a metal tray, it’s just a strip of foam with fabric bonded on both sides. You can pull it out fairly easily from either side. When I made the replacement, I used a piece of weather sealing foam and cut the width to fit the channel (9mm) and bonded the interfacing to each side like the original.
Next, the foam I used was a bit taller than the channel it goes into (15mm where the channel is only 8mm high) but since I used low-density foam I figured it wouldn’t be an issue on the needles. It DID make it much more tedious to get the strip back into the channel, though. I tore the first sponge I made trying to pull it through. I found it easiest to remove the needles and snake the sponge into each section of the channel one by one. I also removed the metal plates on the bottom of the machine that hold the bed sections together for easier access. This is also a good time to clean and lubricate the needles as you’re putting them back.
After this little overhaul I noted that the pins were held more firmly than before, there was slightly more resistance moving the carriage but it moved quite smoothly and the machine has worked beautifully since.
Again, thank you for the great information!
I have done a lot of upholstery work so I would do it a bit differently. Spray one side of the foam sheet and the back side of the fabric with a light coat of contact cement. Or iron on the fusible bonding as a sheet. Then cut the strips the width you need. Leave extra on each end an trim out the extra foam you don’t need. Cut cloth layer to proper finish length to tuck the end in. You only will need to cut strips off as needed but you will be dealing with a much more stable product.
Have fun
This is soooo helpful! I wondered why my needles bent on every return row. I almost threw my stone age knitting machine away! Do you think double sided tape with the spongy centre would work? And maybe a double layer to thicken it up if needed? Thank you so much for your article!