How To Machine Knit Reversible Cables With Baby Blanket Pattern
I’ve been playing around with reversible cables on my knitting machine, a technique made popular by Lily Chin in a three part series for Machine Knit America in the early 1990’s.
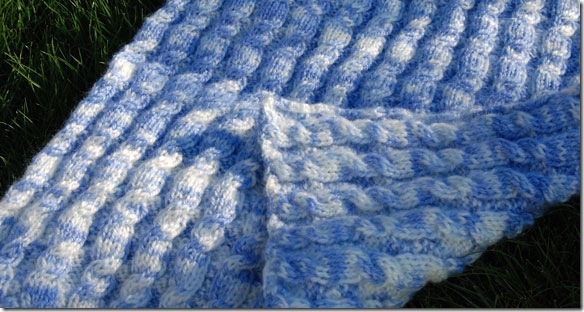
It is a great way to make a truly reversible fabric, a boon when knitting a blanket or shawl. The issues were:
- Volume 2, Number 5 – crossing cables within the same column
- Volume 2, Number 6 – crossing cables across purl/knit columns
- Volume 3, Number 1 – review of technique and a sweater pattern with reversible cuffs
A follow up piece with a more challenging tuck/reversible technique is suppose to be found in Volume 4, Number 2. I have yet to track it down to know for sure.
Anyway, the technique requires a ribber. You establish a basic rib pattern such that there are enough adjacent stitches on the main bed to cross a cable of your width choosing, followed by enough adjacent stitches on the ribber bed. You can cross a 3 x 3 on one bed and a 2 x 2 on the other. The two beds don’t have to have identical layouts. Let your imagination run wild.
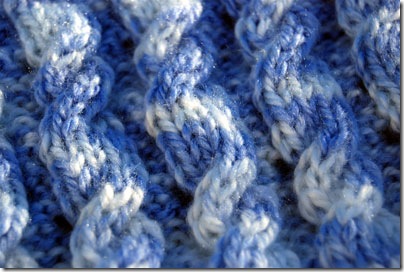 You set up a pattern where you cross stitches on one bed, knit a few rows, then cross stitches on the opposite bed.
The combination of crossing stitches plus knitting a rib really draws the fabric in, allowing the crosses that appear in the purl areas to have a wavy appearance, yet still look like purl channels.
A basic cable is a 2 x 2 cross, so I decided to keep things simple and use the stitch pattern from the fringed shawl pattern in Lily’s first article.
Using my bulky machine, I cast on in full needle rib (every needle knits on both beds) with waste yarn and then rearranged the needles as follows, with ribber at half pitch.

My blanket was 126 working needles wide because I made it a doll/premie size
Once my cast on was complete, my needles rearranged, and a few more rows knitted with waste yarn just to be safe, I ended with my carriage at the right. Switch to your main yarn. I used Lion Brand Jiffy and a tension of T 6.2/7 (my ribber bed is funny, needing a bit more space to knit evenly with the main bed).
Since I like both charts and words, you get both.
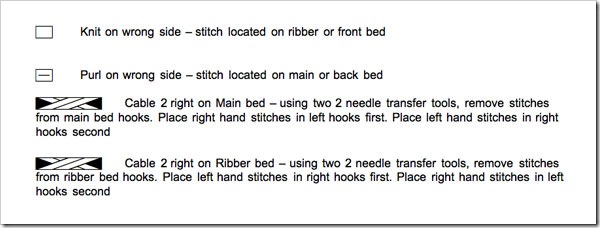
Remember, charts are read beginning in the bottom right corner.
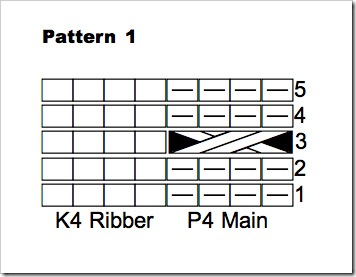 Follow Pattern 1 to start the blanket. The two end stitches located on both sides of the ribber bed are not included in any of the charts. You will also have an extra 4 stitches on the left side of the main bed because I prefer the more symmetrical look to my blankets.
RC 000
Knit 3 rows
Cable 2 right on main (back) bed
Knit 2 rows
RC 005
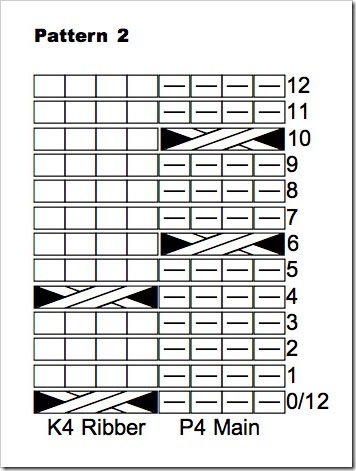 Follow pattern 2 for the body of the blanket.
RC 000
Cable 2 right on ribber (front) bed
Knit 4 rows
RC 004
Cable 2 right on ribber (front) bed
Knit 2 rows
RC 006
Cable 2 right on main (back) bed
Knit 4 rows
RC 010
Cable 2 right on main (front) bed
Knit 2 rows
RC 012
Repeat these 12 rows for the body of your blanket.
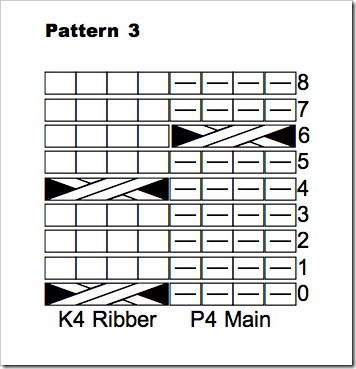 When your blanket is long enough, end it so it will match the beginning by following Pattern 3.
RC 000
Cable 2 right on ribber (front) bed
Knit 4 rows
RC 004
Cable 2 right on ribber (front) bed
Knit 2 rows
RC 006
Cable 2 right on main (back) bed
Knit 2 rows
RC008
Remove on waste yarn
Like the XOXO blanket from the July 30th entry, when Pattern 3 is done, switch to waste yarn. Knit several rows and remove blanket from machine. Starting at end opposite where main yarn is still attached, use a crochet hook or latch tool to latch the last row loops in chain. Draw the main yarn tail through to secure. Repeat this cast off on the cast on end so the two ends are identical. This simple cast off will follow the flow of the cables and give a slightly ruffled look.
My finished doll/baby blanket measures about 20″ by 20″ and used 3 skeins of Jiffy. It took me 4 to 5 hours to complete. The reversible cable technique if pretty straight forward when only crossing cables within the same column, however it does take time to hand manipulate all those crosses.
Tips for success
1. Remember that cable crossing chart symbols are written from the hand knitters perspective. It assumes that you are looking at the right (knit) side of the fabric. On a knitting machine, the main (back bed) appears as purl to the knitter. However we are making a reversible fabric that appears identical on both sides when removed from the machine, so when I tell you to cable 2 right on main (back) bed, if you were to get up and walk around the machine and look at it from that perspective, the cable instructions will make more sense and be identical to the cable 2 right crosses on the front bed – even though you have to cross them differently since both beds are manipulated from the front of the machine.
2. Cables are crossed on the row last knitted, they are not a “separate” row when reading the charts. In machine knitting, you must knit the row first, then cross the cables. In hand knitting, you cross as you reach the stitch to be knitted. So, Pattern 2 actually begins on the last row knitted of Pattern 1 – that is why I labeled it row 0/12, so the RC would not get confusing. Each time your row counter reaches 12, you know it is time to go back to the beginning of Pattern 2, reset your counter to 0, and cross your stitches according to that 0/12 beginning row.
3. I found it best to reset my row counter after every set of twelve so I didn’t get lost and cross on the wrong bed or knit the wrong number of rows in between. It made it easier on me since kids and life frequently interrupt my knitting.
4. After you have gone across the bed and made your crosses for any given row, STOP! STOP! STOP!
Take your transfer tool and lay it beside each crossed pair to double check that you have them all going the same direction. It can get hypnotic staring at the crosses, and then very easy to miss a mistake. By laying the tool on the angle of the cross, the brain is forced to recognize a mistake when you have to turn your wrist to match the wrong angle.
If you have crossed the main (back) stitches correctly, what you see appears to be leaning to the right because you are looking at the back/purl side of the cross which appears on the front side of the blanket.
If you have crossed the ribber (front) stitches correctly, what you see appears to be leaning to the right because you are looking at the front/knit side of the cross which appears on the back side of the blanket.
You can demonstrate this to yourself by crossing your fingers and see how they are arranged when viewed from the front or back.
Now knit the 2 or 4 rows called for in the pattern of the row you are on. There is nothing worse than finishing a blanket and finding a few wayward cables.
Related Posts
August 30, 2007


2 comments
Cool! Why hasn’t someone come up with this before? It makes so much sense! I LOVE your site. Thanks!
Linda in TX
Nice write up. I have a question. Please email me.
Thanks.